Ringcentral Softphone
The new telephony softphone is called Ringcentral and it integrates with MS Teams Software for PCs and Apple Macs as well as Mobile phone devices(Android and iOS).
The Ringcentral Softphone is designed to provide telephony services on and off campus using a software version of our Ringcentral telephones.
Below is guidance in how to install and make use of the softphone client:
- Installation
- Making calls
- Receiving calls
- Transferring calls
- Forwarding calls
- Configuration
- Conferencing
- Managing queue calls
- Adding an Emergency Response Location
Installation
Mobile phones
To install Ringcentral Application on a Mobile phone(Android & iOS) click here.
To use Ringcentral Application on a Mobile phone(Android & iOS) click here.
Self-Managed device
To install Ringcentral For Teams on a self managed device(Windows and Apple Mac) click here
QMUL Managed Windows Device
This process is to be followed by staff with Managed Windows laptops. It involves installing the Ringcentral Plugin from the Software Center. Once installed you will be able to use the Ringcentral Softphone in MS Teams.
Steps are as follows:
- Ensure you are connected to the VPN by confirming you can see this icon in the System tray .
- Search for “Software Center” in Windows Search bar and click on it.
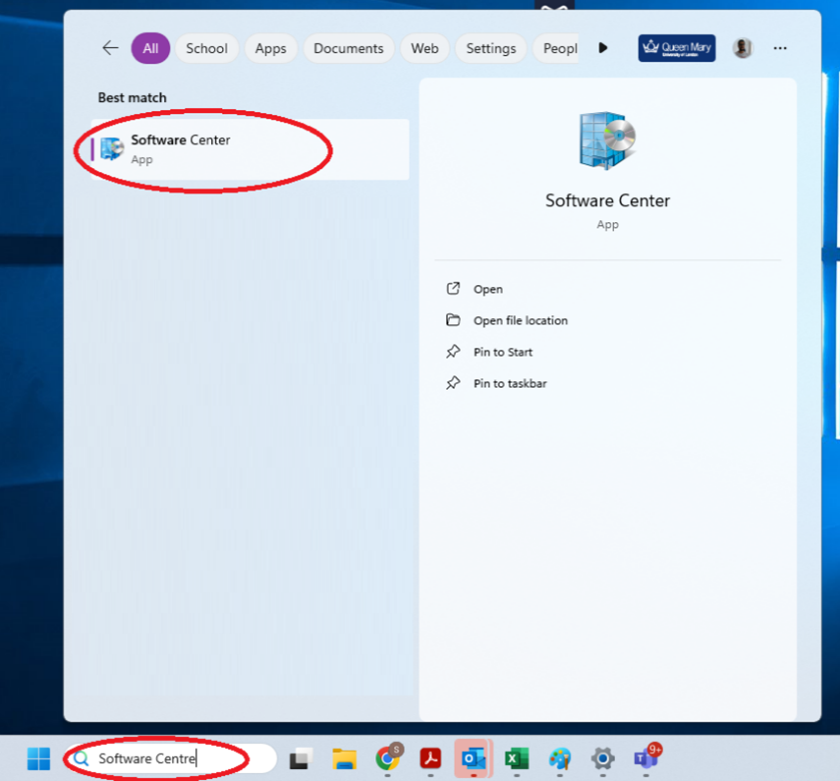
Note: If you are unable to load Software Center please raise a Service Desk ticket FAO Client Devices Team.
3. Click on Ringcentral and then ‘Install’: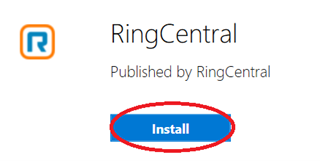
Note: If you are not seeing the Ringcentral icon you may need to wait for 24 hours in order for your computer to update.
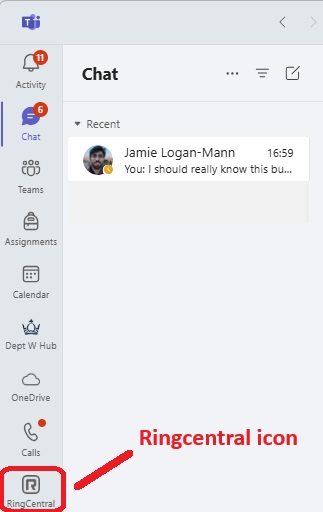
4. Once the installation is complete open MS Teams and click on the ‘Ringcentral’ icon along the left vertical bar:
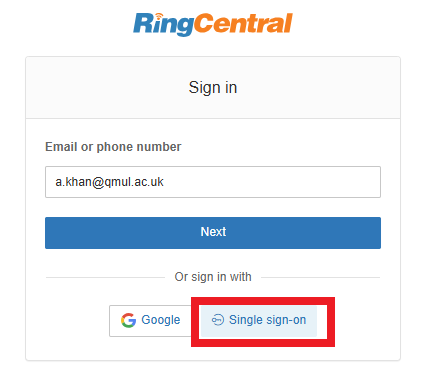
Click on ‘Sign in’ and enter your QMUL email address followed by on ‘Single sign-on' and then ‘Submit’:
Note: if you don't see the Ringcentral icon in MS Teams go to step 8(Further Installation Guidance) instead.
Steps 5, 6 and 7 to be performed only once
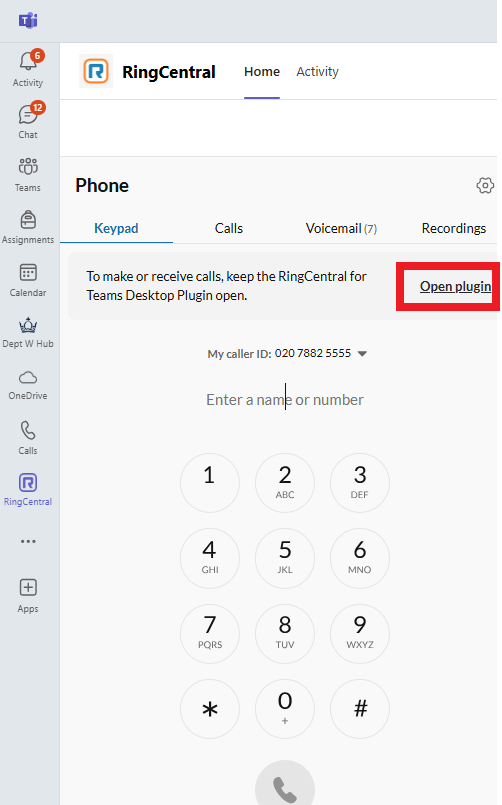
5. Now logged in to Ringcentral, click on the ‘Keypad’.

You maybe prompted with the message:
“To make or receive calls, keep Ringcentral for Teams Desktop Plugin open”.
If so, click on “Open plugin”:
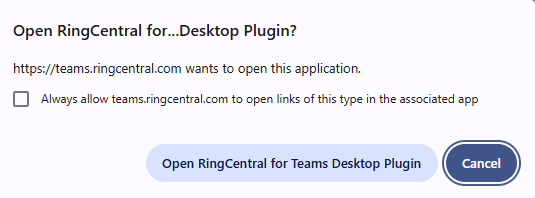
6. Select the tick box and then click on “Open Ringcentral for Teams Desktop Plugin”:
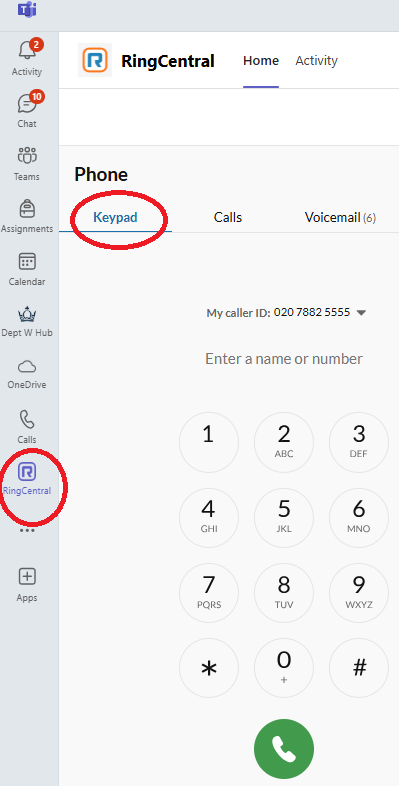
7. Make a test call by dialling a number.
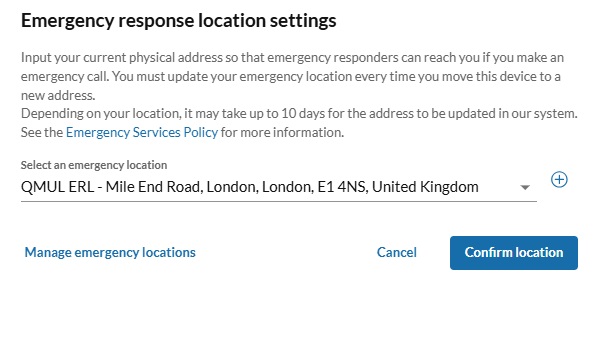
Note: You maybe prompted to set up an emergency response location:

Select the QMUL ERL option and then ’Confirm location’.
8. Further installation guidance
In MS Teams if you do not see a ‘Ringcentral’ icon on the left vertical bar, click on the 'App' icon to add it manually.
Search for ‘Ringcentral’ app and then click ‘Add‘:

Once installation is complete click on ’Open’ and complete steps 5,6 and 7.
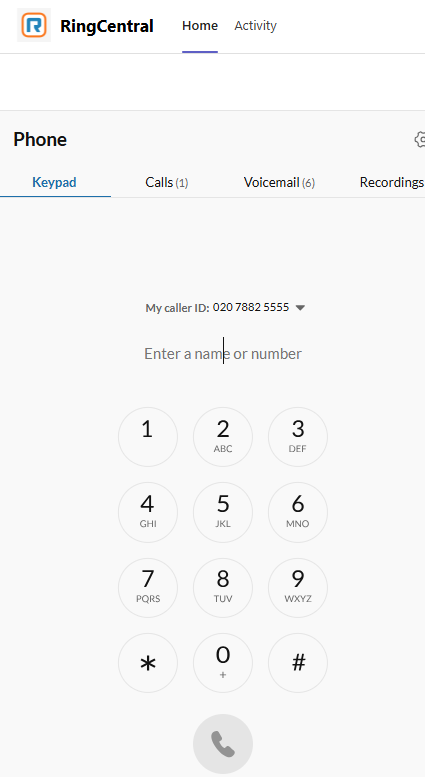
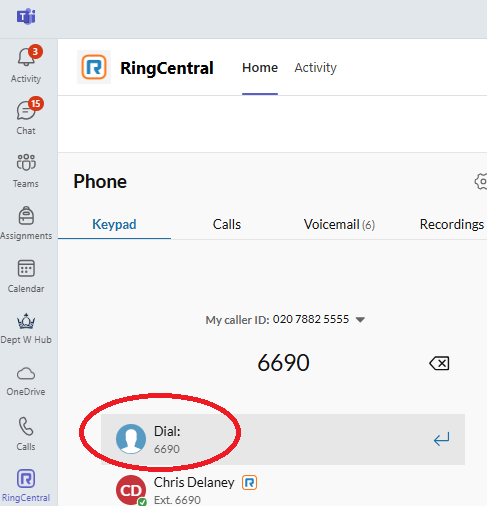
Making a call
|
|
|
|
Click on ‘Enter a name or number’ and type a name, extension number or phone number you wish to call. name . |
|
|
|
|
|
To end the call press the red button. |
|
|
|
|

Receiving a call
When a call comes in the following Ringcentral window will appear on your screen:
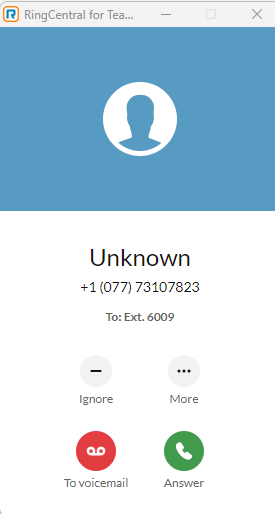
In the above case the call is coming in from an unknown number. To answer press the green button. To reject press the red button.
To end the call press the red button:

If the call is missed an email will be sent from Ringcentral softphone notifying the the reciept of the missed call along with caller‘s information and the date and time when the call was missed.
Transferring a call
|
Calls in progress can be placed on hold by clicking on the ‘Hold’ button |
|
|
Music will be played whilst on hold. |
|
|
Calls can be taken off hold by clicking the button again |
|
|
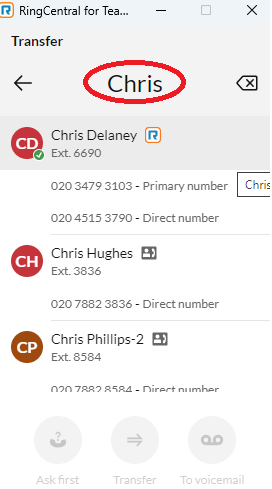
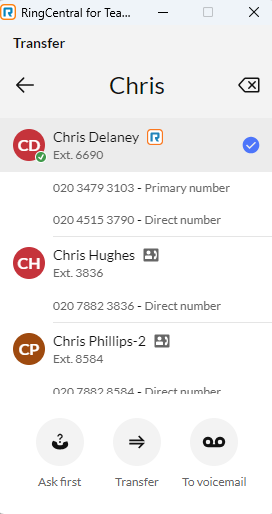
Calls in progress can be transferred by clicking on the 'Transfer’ |
|
|
In the Search box, type the number or name of the person you wish to transfer the call to. |
|
|
Press on the contact that you wish to transfer the call to and then ’Transfer’ button. The call will then transfer. |
|


Forwarding calls
It is possible to forward calls to another extension or an external phone number. This is done by creating an incoming call rule.
|
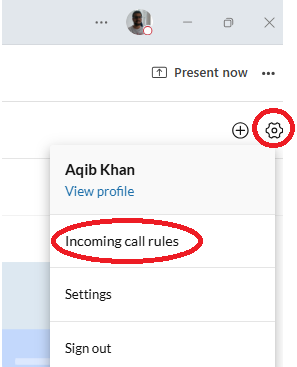
In MS Teams Ringcentral click on the ‘More Settings’ cog icon near top-right corner of the screen and select ‘Incoming call rules’. |
|
|
Select the ‘Forward all calls’ option: |
|
|
In the ‘Incoming calls’ drop-down menu select ‘Forward the call’ and then click on the arrow icon below the drop-down menu. |
|
|
Having selected a contact from the directory select ‘Save’. |


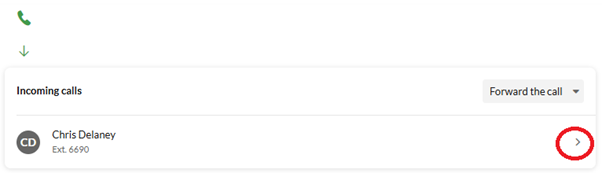
The forward will be activated as a red ribbon appears at the top:

Make a call to test the forward is working.
Configuration
|
When deployed the Ringcentral client does not require any customisation before it can be used. The following section describes some of the optional configurations you may want to make to get more out of the Ringcentral client. |
|
|
Setting up Working Hours |
|
|
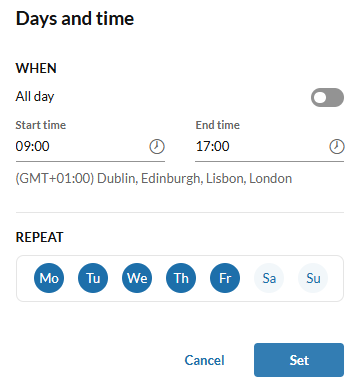
To prevent the Ringcentral softphone ringing out of normal working hours, you will first need to edit the current default working hours schedule to reflect the hours you work. |
|
|
In MS Teams Ringcentral click on the ‘More Settings’ cog icon near top-right corner of the screen and select ‘Incoming call rules’. |
|
|
Under ‘My work day’ select the arrow next to the ‘Incoming calls’ section: |
|
|
Edit the current default work schedule ”24 hours, every day” by clicking on it and entering your work hours: |
|
|
Select the start and end time, along with the days you work under ‘Repeat’. |
|
|
This will bring you back to the ‘Working hours’ window. |
|


|
Setting up Welcome greeting |
|
|
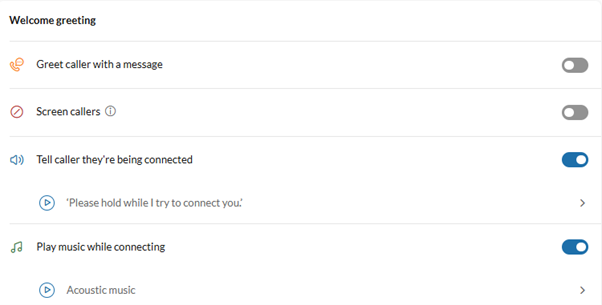
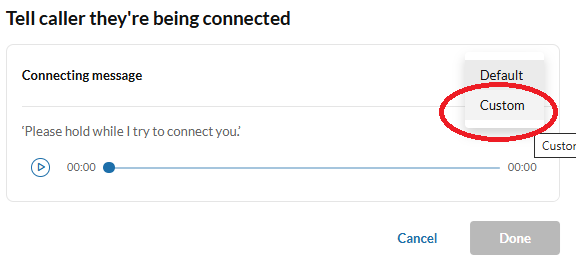
By default, the greeting: ‘Tell Caller they’re being connected’ is enabled with a pre-recorded message of “Please hold while we try to connect you”. |
|
|
If you would like to change this message, click on the message itself and then ‘Default’> Custom. |
|
|
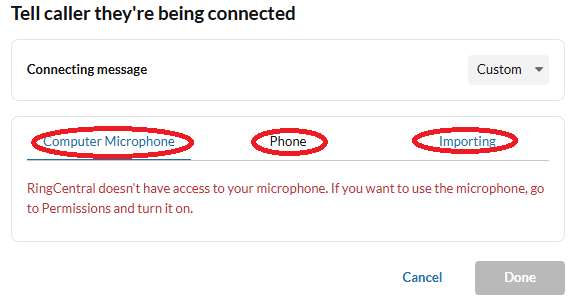
You will find options to record your own message. |
|
|
For example, if you wish to record your message through your mobile phone, select the ’Phone’ option and enter your contact number you wish to receive a call on. Once the calls is received record your message and save. |
|
|
If you would like to turn the greeting off all together toggle the button to the left as shown below: |
|

Setting up After hours
Having created a working hour schedule, an after-hours schedule needs to be created so calls received out of hours can be handled accordingly.
In MS Teams Ringcentral click on the ‘More Settings’ cog icon near top-right corner of the screen and select ‘Incoming rules’:
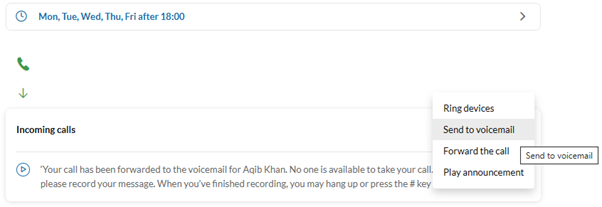
Under ‘My work day’ Select the option ‘After hours’ section:

The default option set for incoming call is to ’Send to voicemail’. There are three other options to choose from. Select the drop-down menu in the ‘Incoming calls’ section to select:
Pick the option you require and follow through with any additional configuration required.
For example, if you wish to play an announcement rather than receive a voicemail, select the ’Play announcement’ option.
By default, the announcement played is: ’Announcement. No one is available to take your call. Thank you for calling. Goodbye!’
If you wish to change this announcement you can record your own message. To do this click on the announcement which will bring up a dialog box. Select the ‘Default’ drop down menu and click on ‘Custom’ where there are options to record your greeting:
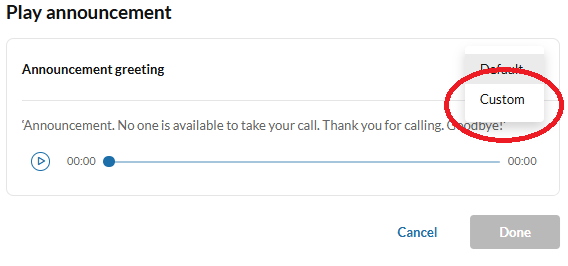
There are three options available to record your own greeting:
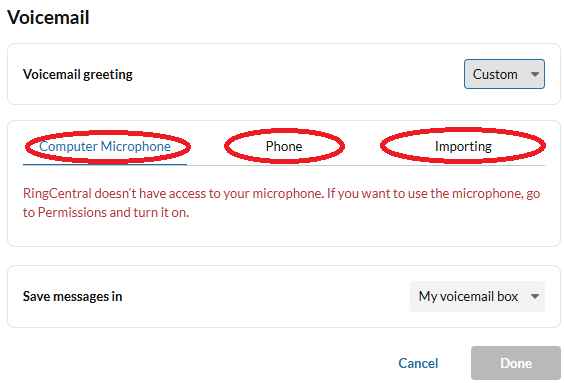
For example, if you wish to record your message through your mobile phone, please select the ’Phone’ option and enter your contact number you wish to receive a call on. Once the calls is received record your message and save.
Finally press ’Done’ and then ’Save’ again.
Conferencing
Conference calling with 10 or less participants
You can seamlessly add up to 10 participants to your RingCentral active call. Whilst on a call press the ‘Add’ button on the Ringcentral dialpad and enter the number or name you wish to add to the call:
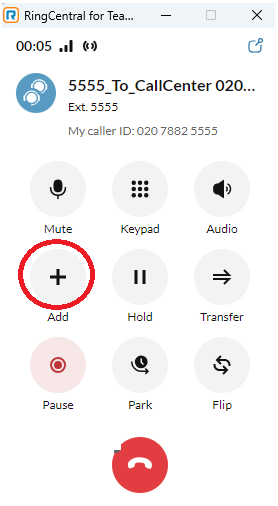
This will put the current call on hold.
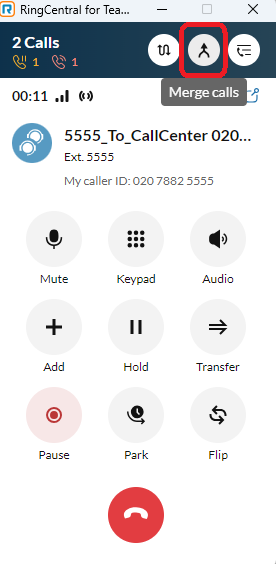
Once you have connected to the new call press the ‘Merge’ calls button at the top of the dial pad window to create a conference call:
Conference calling with more than 10 participants
To make a conference of a larger group click the ‘+’ icon in the top right corner of Ringcentral within MS Teams:
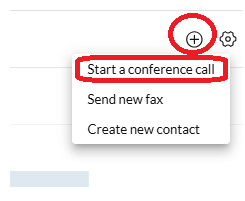
A dialog box will appear with details of the conference number to share with the participants as well as the access code.
You can share these details via email as well by selecting on the ‘Invite’->’Invite by Email’:
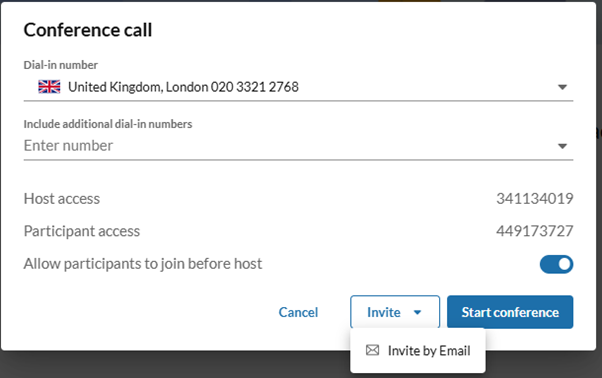
To start the conference press on the ’Start conference’ button.
Managing queue calls
If you are a member of any call queue you can control receiving calls from that queue. This is achieved in MS Teams Ringcentral by click on the ‘More Settings’ cog icon near top-right corner of the screen and selecting the ‘Accept queue calls’ toggle button. Turning it to the left disables the queue and to the right enables it.
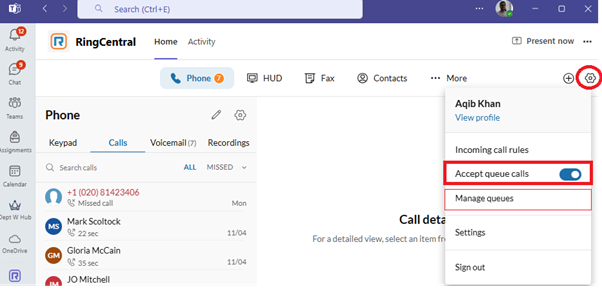
If you are a member of more than one Call queue you can manage the opting in-out of individual queues under the ‘Manage queues’ menu.
Adding an Emergency Location
To set or update your emergency location , select the 'Ringcentral' in MS Teams located on the left vertical bar.
Click on the Settings cog and then 'Phone settings':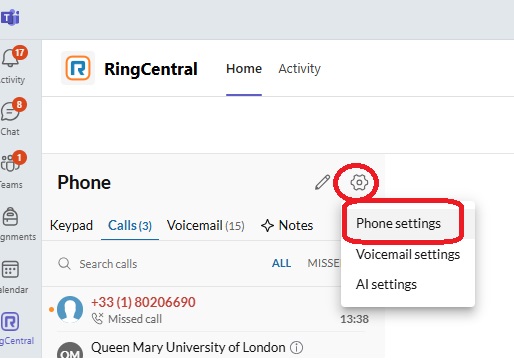
Select 'Manage' under 'Emergency Response Location' and then the '+' sign on the next dialog box.
Add the emergency details as required: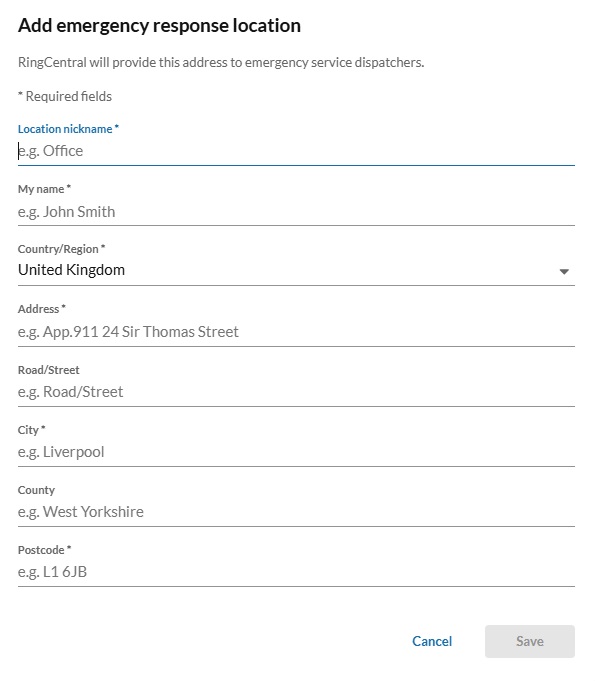
Select 'Save'.
Ensure the newly entered location is selected from the below dialog box and then 'Confirm location':